


Tidying up your old Instagram posts isn't just a housekeeping task—it's a serious branding play. Knowing how to mass archive Instagram posts is what separates a cluttered, forgotten profile from a sharp, curated one. It's how you refine your brand's story, shine a spotlight on your best work, and hang onto valuable engagement data, all without hitting that dreaded delete button. Think of it as the strategic way to refresh your digital storefront.
Why Mass Archiving Is a Smart Instagram Strategy
Before we get into the nuts and bolts, let's talk about the why. A messy, inconsistent Instagram grid can seriously water down your brand’s message and even turn off potential followers. Every single post adds to that crucial first impression, and a feed packed with old promotions or off-brand content just weakens your impact. Mass archiving is your secret weapon for strategic content curation.
The best way to think of your Instagram profile is as a curated gallery or a professional portfolio. An artist wouldn't show off every single rough sketch, right? Your brand shouldn't have to display every piece of content it's ever made, either.

Preserve Engagement While Polishing Your Profile
One of the biggest wins for archiving over deleting is that you get to keep all your data. When you delete a post, every like, comment, and share associated with it is gone for good. Poof. Archiving, on the other hand, just tucks the post away from your public grid into a private folder. All that engagement you worked so hard for? It stays right there, safe and sound, visible only to you.
This is a huge deal for a few reasons:
- Performance Analysis: You can still dive into the analytics of archived posts to figure out what worked and what didn't, helping shape your future content.
- Content Repurposing: That post you archived might become relevant again next year. If it does, you can unarchive it and bring it right back to your profile.
- Aesthetic Cohesion: It's the key to maintaining a polished, visually consistent grid without having to sacrifice your historical data.
The core benefit is control. Archiving gives you the power to reshape your brand's story on Instagram without erasing its history. It's about putting your best foot forward, always.
Keeping Up with Content Velocity
The breakneck speed of social media makes strategic archiving more critical than ever. In 2026, the average half-life of an Instagram post is a mere 18.27 hours. That means half of its total engagement happens in less than a day before its visibility plummets.
With over 95 million photos and videos being shared on the platform daily, content gets stale, fast. For business accounts posting frequently to stay relevant, this leads to a massive backlog of posts that have lost their initial shine. If you want to learn more, check out these insights on the lifespan of social media content to see why this matters. In this environment, mass archiving isn't just a preference—it's an essential management strategy.
If you'd rather stick to the official, built-in methods, Instagram does give you a way to tidy up your profile. The catch? There's no magical "archive all" button. Still, the platform has come a long way from the painfully slow process of archiving one post at a time. It now has a multi-select feature, though it's a bit tucked away in your activity settings. This is definitely the safest route, since you’re not involving any third-party apps.
First, let's cover the classic method: archiving posts one by one. It’s still around and honestly, it’s perfect for those surgical cleanups where you only want to hide a few specific things. You just go to the post, tap the three little dots in the top-right corner, and hit Archive. Poof. The post vanishes from your public grid and gets tucked away in your private archive, with all its likes and comments safely attached.
Finding the Bulk Archive Feature
For a more efficient cleanup, you'll need to head over to the "Your Activity" section. This is Instagram’s central hub for managing pretty much everything you've ever shared or interacted with, making it a powerful tool for this kind of project. It’s the closest you'll get to a native solution for mass-archiving posts.
Getting there is simple:
- From your profile, tap the hamburger menu (the three horizontal lines) in the top-right corner.
- Choose Your Activity from the list.
- Under the "Content You Shared" section, tap on Posts.
This brings up a grid of all your feed posts, organized and ready for you to start making changes.
How to Select and Archive Multiple Posts
Once you're looking at your post grid in "Your Activity," tap the blue Select button in the top-right. This switches the interface into selection mode, letting you tap the thumbnails of all the posts you want to send to the archive. You'll see a little blue checkmark appear on each one you select, and a running total will show up at the bottom of the screen.
One of the most useful features here is the ability to sort your posts by date—either newest to oldest or vice versa. This is a massive help when you're trying to target a specific time period. For example, if you want to archive an entire campaign from 2022, you can just sort by "Oldest to Newest" and scroll right to that year.
The biggest downside here is the manual scrolling. If you have an account with thousands of posts spanning several years, getting to the very beginning can feel like a marathon. There’s no search function or date-range filter, which makes it a bit clumsy for huge, multi-year cleanups.
After you’ve picked all the posts you want to hide, just tap the Archive button at the bottom of the screen. Instagram will pop up a final confirmation, and once you approve it, all those selected posts are moved into your archive. It’s a huge step up from the old one-by-one method, but how efficient it is really depends on how deep you need to dig into your history.
When you’ve got a massive grid cleanup on your hands, the native "Your Activity" tool just won't cut it. Let’s be real—it's not built for scale. For social media managers, agencies, and creators with thousands of posts, trying to archive manually is a recipe for a headache. This is where automation and third-party tools come in, offering a far more powerful and efficient path to a curated grid.
These solutions are designed from the ground up to handle the volume that Instagram's own features struggle with. They usually come in two flavors: browser extensions for your desktop or dedicated mobile and web apps. Their job is simple: connect securely to your Instagram account and give you an interface that makes selecting huge batches of content a breeze. Instead of endless, mind-numbing scrolling, you can use advanced filters to pinpoint posts by date range, engagement metrics, or even hashtags.
How Third-Party Archiving Tools Work
The process is pretty consistent across most reputable tools. First, you'll authorize the application to access your Instagram profile—a critical step where you absolutely need to be cautious. Once you're connected, you'll see a dashboard that lays out your entire post history in a much more manageable format than the app's grid view.
From there, you can start filtering to isolate exactly what you want to archive. Imagine needing to hide all your posts from a two-month period last year. Manually, that’s an afternoon killer. With a good third-party tool, you can just set the start and end dates and select every matching post with a single click.
This guide helps visualize when to stick with Instagram’s built-in features versus when it’s time to call in the cavalry.
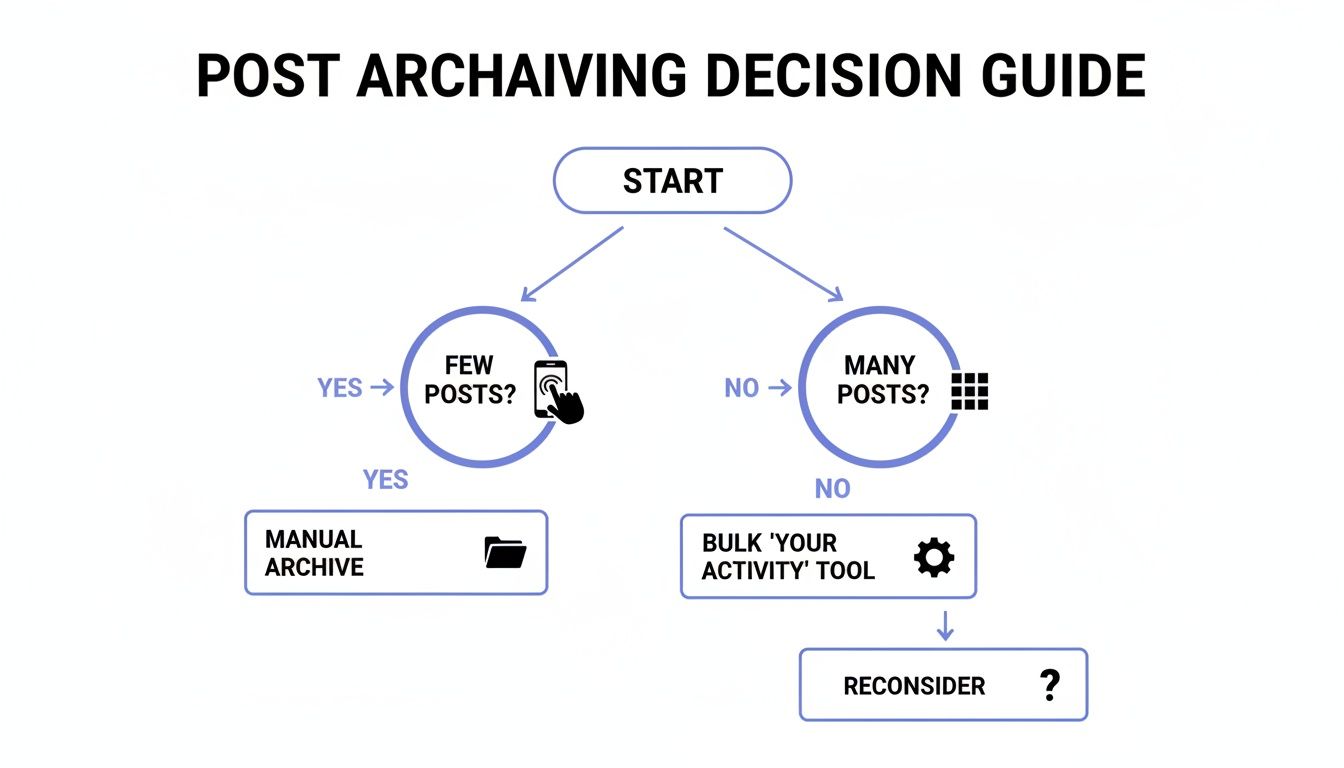
The takeaway is clear: efficiency is the name of the game. As your content library grows, so does the need for a specialized tool.
To help you decide which path is right for your situation, here's a quick comparison of the available methods.
Comparing Instagram Archiving Methods
| Method | Efficiency Level | Safety | Best For |
|---|---|---|---|
| Instagram Native ("Your Activity") | Low | High | Archiving a small number of recent posts (under 50). |
| Third-Party Automation Tools | High | Medium to High | Mass-archiving hundreds or thousands of posts with filters. |
| Manual One-by-One Archiving | Very Low | High | Hiding just one or two specific posts without leaving your feed. |
Ultimately, for any significant volume, a dedicated tool is going to save you an incredible amount of time and effort. Just make sure you pick the right one.
Vetting Tools and Protecting Your Account
Handing over access to your Instagram account is a big deal, and security has to be your number one priority. Not all third-party tools are created equal—some are reputable, while others are sketchy scripts that could compromise your account.
Before you even think about connecting a tool, run through this checklist:
- Read Reviews and Do Your Homework: Look for feedback from other social media managers or trusted industry blogs. A total lack of reviews is a massive red flag.
- Understand the Permissions: Pay close attention to what the app is asking for. It should only need access to manage posts, not your DMs or personal info.
- Check for a Privacy Policy: Legitimate services will have a clear, accessible privacy policy that explains how they handle your data. If you can't find one, run.
- Start Small: Test the tool on a small batch of non-critical posts first. Make sure it works as advertised without any weird side effects before you go all-in.
Instagram's archive feature is a strategic goldmine, especially for the 65 million business accounts expected to be active by 2026 that rely on historical data. Hiding posts preserves vital engagement stats, which is a huge advantage when frequent posting—up to nine times a week for an 18% reach gain—can lead to over 500 new posts a year. For anyone managing a high-volume account, these tools are often the only scalable way to maintain a polished brand aesthetic.
Always remember: if a tool promises to do things that sound like they violate Instagram's terms of service (like mass following or auto-commenting), stay far away. Stick to tools that are purely focused on content management.
While these tools are game-changers for cleaning up your feed, a solid scheduling strategy is just as important for what comes next. To keep your newly curated feed consistently updated, you might want to check out a top-tier Instagram scheduler.
Building Your Smart Content Archiving Plan
Knowing how to mass archive Instagram posts is only half the battle. The real strategic edge comes from knowing what and when to archive. Without a plan, you're just tidying up. With one, you're actively curating a high-performance profile.
You need to move beyond gut feelings and establish clear, data-informed criteria for what stays and what goes. This isn't just a cleanup—it's about shaping a cohesive grid that perfectly reflects your brand as it is today.
Defining Your Archiving Criteria
First things first, let's identify the usual suspects. Every account has posts with a limited shelf life, and creating a list of these categories will make your decisions quick and consistent.
You should probably consider archiving posts like these:
- Outdated Promotions: Content about past sales, limited-time offers, or events that are long over.
- Off-Brand Content: Those old posts from when your brand voice, aesthetic, or even your mission was totally different. We've all been there.
- Low-Performing Posts: Content that just didn't land. If the likes, comments, and shares are way below your average, it might be time to hide it.
- Visually Disruptive Posts: Images or graphics that just don't vibe with the aesthetic flow of your current grid.
Just as important is knowing what to protect. Your high-engagement posts, glowing user-generated content, and evergreen educational guides are the pillars of your profile—leave them be. A great way to see the "after" is by using an Instagram feed planner to visualize how your grid will look once you’ve made the changes.
Establishing a Regular Archiving Cadence
Archiving shouldn't be a frantic, once-a-year emergency. To keep your profile looking sharp, you need to build this into your regular social media management routine. How often you do it depends on your posting volume and how often you run campaigns.
An effective archiving plan is cyclical. It’s a recurring health check for your profile that ensures your grid is always your best-performing, most relevant highlight reel.
For most brands, a quarterly review is a perfect starting point. It’s frequent enough to handle seasonal campaigns but not so often that it feels like a chore. If you're running a high-volume account or managing multiple clients, a monthly check-in might be a better fit.
This kind of strategic maintenance is more critical than you might think. By 2026, accounts posting 6-9 times a week see a 0.44% follower growth rate—that's nearly 3.7x higher than less frequent posters. At that pace, you could be adding over 300 new posts a year, many of which will quickly lose relevance. As Buffer's data on how posting frequency impacts growth on buffer.com shows, a steady stream of content is key.
Mass archiving is the perfect solution. It lets you hide the underperformers and keep your profile focused on what works, all while saving the post and its analytics behind the scenes.
Best Practices Before and After You Archive
Knowing how to mass archive your Instagram posts is one thing, but a pro-level workflow means being smart about what you do before and after. Skipping these bookend steps is a recipe for accidental data loss or a grid that just doesn't hit the mark.
Think of it as the prep work and quality control for your digital brand.
Before you even think about touching a single post, the absolute most critical first step is to back up your Instagram data. This is your ultimate safety net. If a tool glitches, or your finger slips and you hit delete instead of archive, you'll have a complete, personal copy of every photo, video, and story you’ve ever shared.
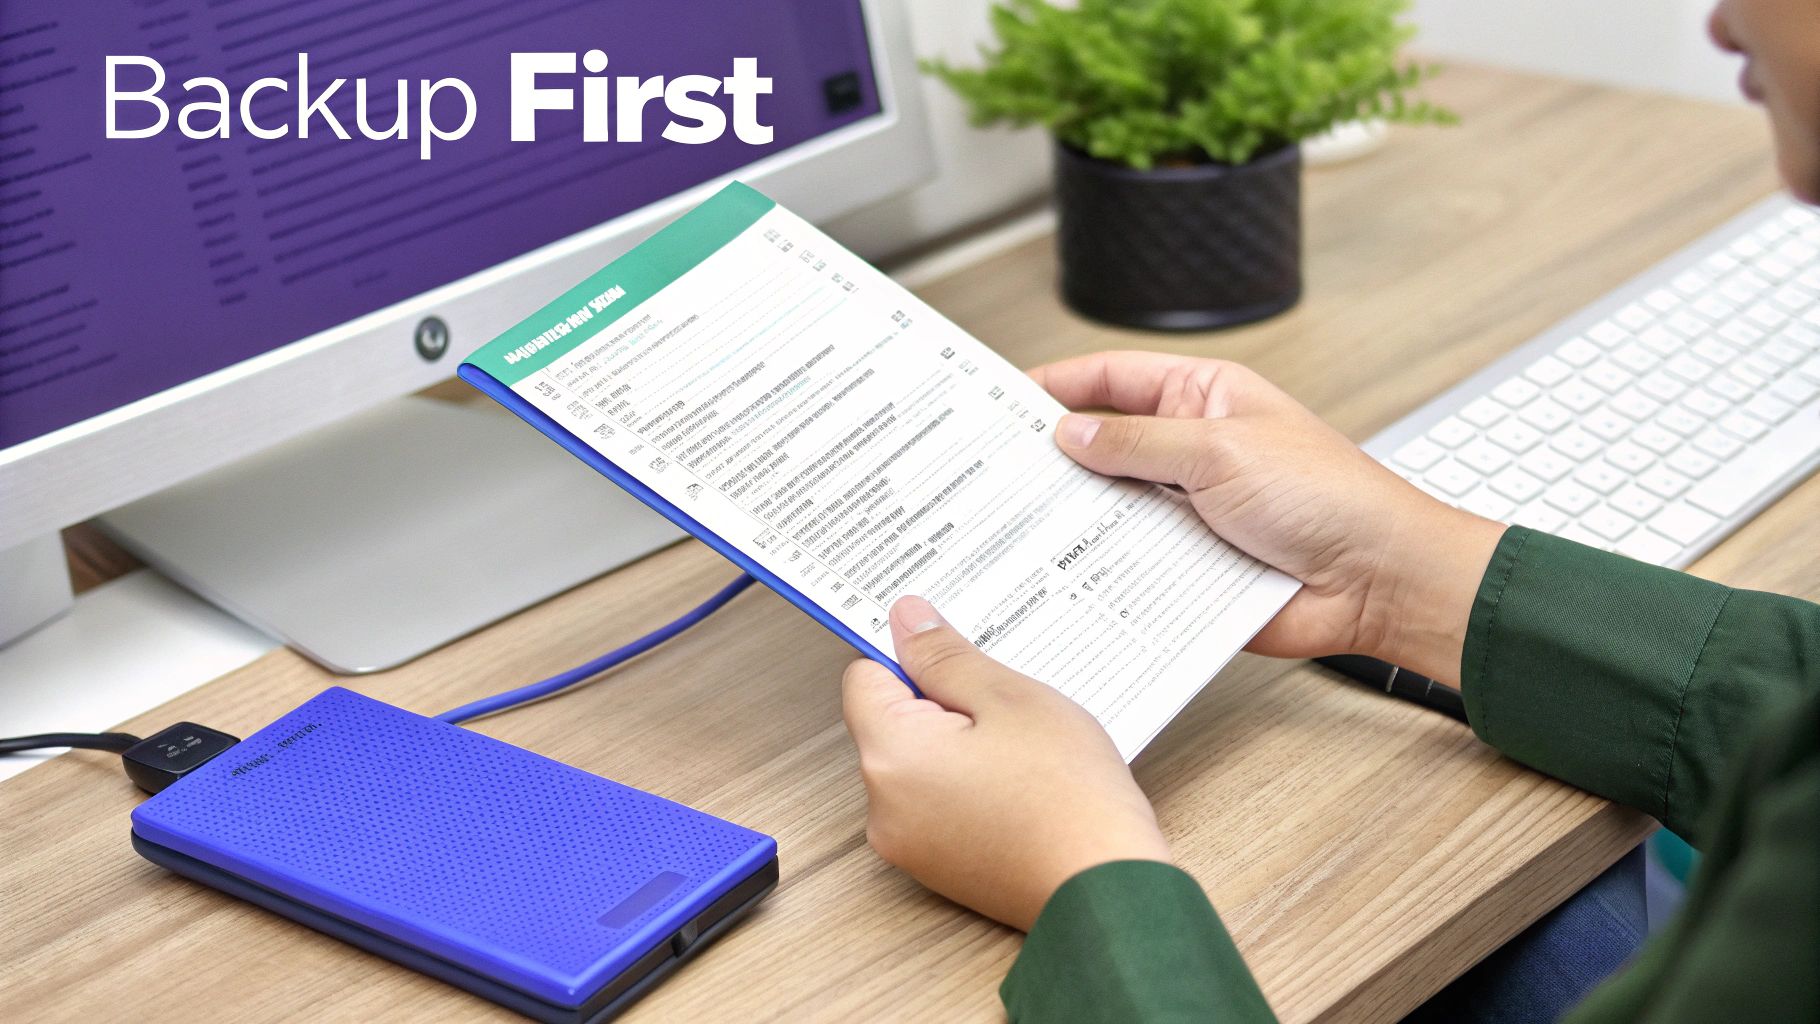
Securing Your Data First
Instagram actually makes this part pretty easy with its built-in "Data Download" feature. You can request a file with all your information, and they’ll package it up and email it over to you.
Here’s how to kick off your backup:
- Head to your profile and tap the three-line menu icon.
- Go to Your Activity, then scroll all the way down and select Download your information.
- Just confirm your email, and hit request.
Now, this isn't instant. It can take up to 14 days for Instagram to get everything compiled, so you absolutely need to plan this well ahead of your archiving sprint. Once that file lands in your inbox, you can breathe easy. And to keep that backup useful long-term, it's a good idea to follow some solid Metadata Management Best Practices so your content stays organized and searchable.
Post-Archive Review and Auditing
Okay, so you've finished the mass archive. You're not quite done yet. Now it's time for a quality check to audit your newly refined profile. This is where you double-check that the right content is gone and your grid looks exactly how you pictured it.
Start by hopping over to your archive folder. You can get there by going to your profile, tapping the menu icon, and selecting Archive. From there, you can toggle between your Stories Archive and Posts Archive. Give the Posts Archive a thorough scroll-through to confirm everything you meant to hide is actually there.
The post-archive audit is non-negotiable. It's your chance to catch any mistakes, restore posts you archived by accident, and ensure your new grid tells the precise story you want your brand to tell.
What happens if you have a change of heart about a post? Getting it back is just as easy. Tap the post from within your archive, hit the three-dot menu, and choose Show on Profile. Just like that, it pops right back into its original spot on your timeline, bringing its likes and comments with it.
Finally, do a visual audit of your public grid. How does it look? Does it flow well and line up with your current brand aesthetic? This is also the perfect moment for a bigger-picture check-up on your account’s health. If you want to go deeper, you can run a full review using our guide on how to conduct a social media audit. This turns a simple cleanup into a truly strategic refresh.
Clearing Up Your Mass Archiving Questions
Even with a solid plan, it’s natural to have a few questions pop up before you start a massive content cleanup. Think of this as a final sanity check to address the most common things social media managers worry about. Once we clear these up, you can move forward with confidence.
One of the biggest concerns I hear is, "Will archiving tank my engagement?" The short answer is no. In fact, it can actually help. When you archive a post, it’s hidden from public view, so it obviously won’t get any new likes or comments. But all its past engagement is safely preserved.
More importantly, cleaning up your grid to showcase only your best content can boost the overall engagement on what's left. A focused, professional-looking profile is far more likely to grab the attention of new visitors and encourage them to interact.
Can My Followers See My Archived Posts?
Absolutely not. The second you archive a post, it vanishes for everyone but you. Your followers, random visitors, even your mom—nobody can see it.
This complete privacy is the whole point of the feature. Your archive is your own private vault where content is just paused. You can go back, look at old posts, and even restore them, all without anyone else knowing.
Is There a Limit to How Many Posts I Can Archive?
Instagram has never officially said there’s a hard cap on how many posts you can archive. For all practical purposes, you can archive as much as you need to. I’ve personally worked on accounts where we've tucked away thousands of posts in one go using a third-party tool, and Instagram didn't bat an eye.
The only thing to watch out for is temporary action limits if you do too much, too fast, especially with automation tools.
The real limitation isn't some secret number set by Instagram; it's the sheer practicality of the method you're using. Sure, you could manually archive 1,000 posts, but it would be a nightmare. That's why bulk tools are non-negotiable for big accounts.
This is exactly why figuring out how to mass archive Instagram posts efficiently is so critical. It’s not about beating the system, but working smarter within it.
Finally, people often ask if archiving a post pulls it from hashtag pages or the Explore feed. Yep, it does. Since the post is no longer public, it gets removed from all the places it was discoverable. If you decide to bring it back later by unarchiving it, the post will reappear on your grid, but don't expect it to pop back up on the Explore page or in old hashtag searches. Its moment in the spotlight has passed.
Ready to manage your social media content like a pro? PostSyncer provides the AI-powered tools you need to schedule, analyze, and curate your profiles with ease. Start your 7-day free trial and transform your workflow today!